
Views: 0 Author: Site Editor Publish Time: 2026-07-03 Origin: Site


Wall plastering faces a fundamental, unavoidable risk on every job site. Substrate movement, thermal expansion, and curing shrinkage constantly stress the finish layer. These forces quickly lead to hairline fractures and structural cracks if you leave them unmanaged. Fixing failed plaster drains budgets and heavily damages contractor reputations. You will find repairing these failures far exceeds the minimal upfront cost of installing proper reinforcement materials. Specifying the correct mesh mitigates this risk entirely. This guide serves as a practical, technical resource. Procurement managers, contractors, and specifiers can use it to evaluate and select the right materials. We will show you how to properly implement reinforcement based on your specific project demands. You will learn to navigate mesh weights, chemical coatings, and installation protocols confidently. Applying these principles ensures your plaster systems remain durable, smooth, and structurally sound for decades.
Specification Matching: Indoor plastering typically requires lightweight mesh (70g–90g/m²), while exterior facades and EIFS systems demand heavy-duty weights (145g–160g/m²).
Chemical Vulnerability: Raw fiberglass degrades in cementitious environments; specifying an alkali resistant construction mesh is a non-negotiable requirement for structural longevity.
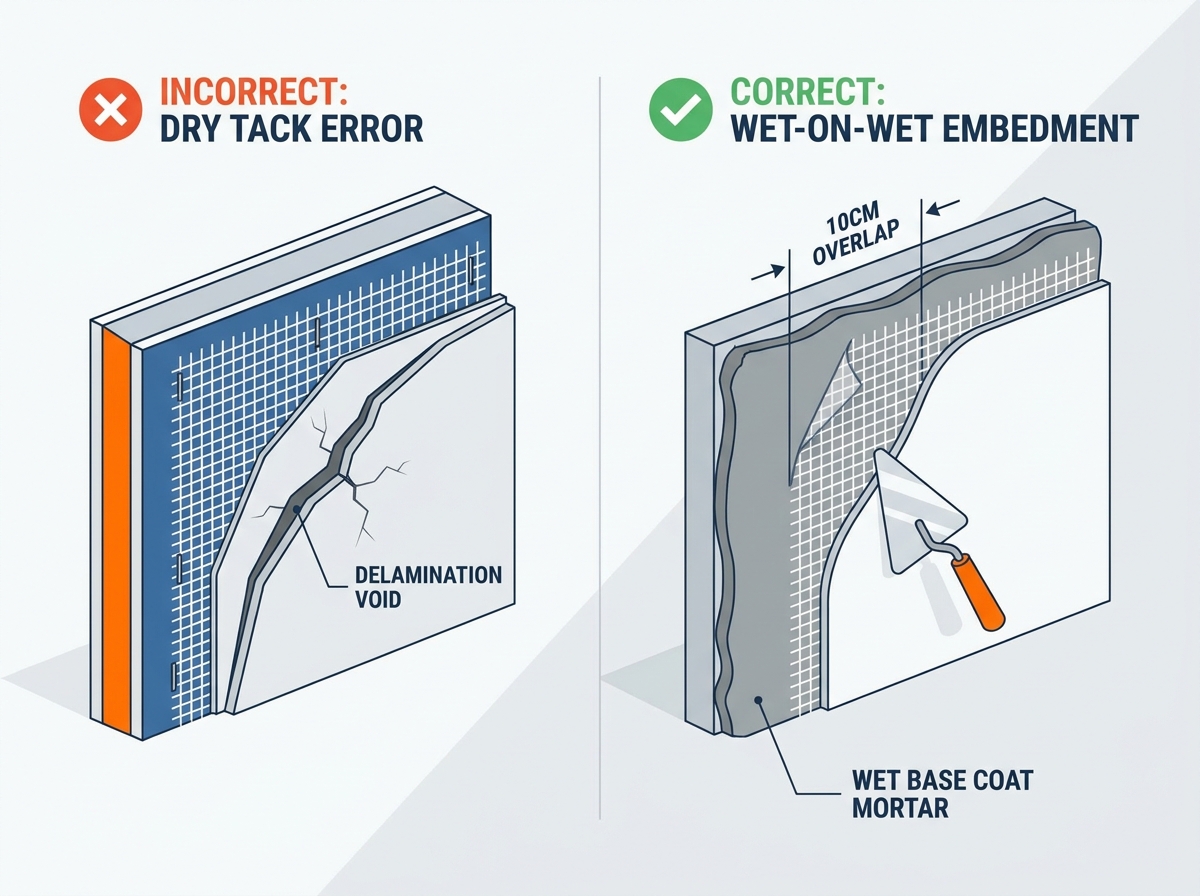
Installation Standard: Proper crack prevention relies on embedding the mesh into the wet base coat, not tacking it dry against the substrate, with a strict minimum overlap of 10cm (4 inches) at all seams.
Unreinforced plaster cannot handle tensile stress. Buildings naturally settle over time. Temperature fluctuations cause daily expansion and contraction across building facades. Concrete block and wood framing move independently beneath the plaster. This constant movement pulls the rigid plaster apart. Without internal support, the plaster layer quickly succumbs to these forces. Hairline cracks form first. Structural delamination soon follows.
Integrating a crack prevention mesh acts as the "rebar" of your plaster layer. You embed the matrix directly into the mortar base. The woven fibers distribute localized stress evenly across the entire surface area. Localized tension no longer overwhelms a single point. The wall moves slightly, but the reinforced plaster holds together.
The commercial impact of this integration is massive. Using reinforcement directly reduces callback rates for contractors. Callbacks destroy project profit margins. Getting the job right the first time protects your bottom line. It also lowers long-term maintenance costs for facility managers. Consistent reinforcement guarantees compliance with modern exterior insulation and finish system (EIFS) building codes. You spend slightly more on materials upfront. You save exponentially on labor, repairs, and liability down the road.
Selecting the correct material determines the success of your plastering project. Using an undersized product leads to failure. Using an oversized product wastes money and complicates the troweling process. You must match the fiberglass mesh for construction to your specific environmental demands. We measure these demands through grammage, aperture size, and tensile strength.
Grammage indicates the density and thickness of the fibers. Heavier weights provide stronger reinforcement but reduce flexibility.
75g – 90g/m²: These lightweight options are ideal for interior wall finishes. Use them for gypsum-based plasters and detailed architectural work. They bend easily around intricate corners.
110g – 130g/m²: We consider these transitional weights. Use them for heavy-traffic interior corridors. They also work well for very light exterior applications under protective overhangs.
145g – 160g/m²: This is the strict industry standard for exterior wall plaster mesh. Use this weight for base coat reinforcement and all EIFS projects. It handles severe wind loads and thermal shocks easily.
Aperture refers to the physical dimensions of the woven holes. Standard sizing ranges from 4x4mm to 5x5mm. This specific range is highly intentional. It allows sufficient wet plaster penetration. The mortar pushes through the holes easily. This creates a powerful mechanical bond. A smaller aperture blocks the mortar. A larger aperture fails to provide adequate tensile rigidity. Sticking to the 4x4mm or 5x5mm standard guarantees optimal integration.
You must know how to read manufacturer data sheets. Look for the warp (lengthwise) and weft (crosswise) strength parameters. Manufacturers test these limits by pulling a 50mm strip of mesh until it breaks. Standard interior grades should exceed 1000 N/50mm. Premium exterior grades must push past 1500 N/50mm. Always verify these baseline numbers. They separate verified, commercial-grade products from cheap imitations.
Application Area | Recommended Grammage | Standard Aperture | Minimum Tensile Strength |
|---|---|---|---|
Standard Interior Gypsum | 75g - 90g/m² | 4x4mm | 1000 N/50mm |
High-Traffic Corridors | 110g - 130g/m² | 4x4mm or 5x5mm | 1200 N/50mm |
Exterior Facades & EIFS | 145g - 160g/m² | 5x5mm | 1500 N/50mm |
Heavy Stone Veneer Base | 200g+ /m² | 6x6mm | 2000 N/50mm |
You cannot use raw, uncoated fibers in cement. The chemistry guarantees a catastrophic failure. Portland cement and many structural plaster mixes are highly alkaline. Their pH levels frequently exceed 12 during the curing phase. Raw glass fibers are extremely vulnerable to this alkaline attack.
When you bury uncoated fibers in wet cement, a chemical reaction begins. The alkaline moisture breaks down the silica structure of the glass. The fibers become brittle within weeks. They eventually dissolve completely over a few months. The wall looks fine initially. However, the internal reinforcement vanishes. Delayed structural failure becomes inevitable. The first seasonal temperature drop will crack the facade. Specifying an alkali resistant construction mesh is mandatory.
Manufacturers solve this problem by applying protective coatings. They coat the raw fibers in acrylic copolymers or specialized latex. This chemical barrier physically separates the sensitive glass from the aggressive cement paste.
You must verify the quality of this coating. Do not simply trust the label. Advise your procurement buyers to request accelerated aging testing data. The standard industry benchmark is strength retention after 28 days of alkali immersion. A premium product retains at least 50% of its original tensile strength after this brutal soak. Inferior products disintegrate during the test.
Procurement teams can perform basic field tests quickly. These simple checks verify if the coating is uniformly applied and resilient.
The Snap Test: Bend a small piece of the material sharply. High-quality coatings feel slightly stiff but will not snap. If the fibers break audibly, the coating is overly brittle.
The Burn Test: Hold a lighter to the edge of the roll. The acrylic coating should emit a distinct plastic smell as it melts. If it burns away instantly leaving raw white glass, the coating is too thin.
The Fold Test: Fold a section completely in half and press the crease. Unfold it. The strands should remain locked in their woven grid. If the cross-threads slide out of place, the coating failed to lock the weave.
Contractors frequently confuse joint tape with broad roll products. You use these two materials for entirely different purposes. Substituting one for the other creates immediate structural liabilities.
Joint tape comes in narrow, self-adhesive rolls. It feels slightly tacky to the touch.
Best for: You use joint tape strictly for drywall seams. It works beautifully for repairing isolated, small cracks. It excels at bridging dissimilar substrate joints. For example, use it where concrete block meets wood framing before applying a thin skim coat.
Limitations: You cannot use tape to absorb structural shifts across large surface areas. The adhesive backing actually creates a barrier. It prevents full mortar penetration. The tape acts locally, not globally.
Broad rolls span one meter wide or more. They contain zero adhesive.
Best for: You deploy broad rolls for full-wall reinforcement. They are required for exterior stucco. You need them when rendering over large, continuous substrates like foam insulation boards.
Integration: Broad rolls require mechanical embedment into the mortar. You do not stick them to the wall. You press them into wet mud. This creates a unified, monolithic structural layer.
Feature | Joint Tape | Broad Full-Surface Roll |
|---|---|---|
Adhesive Backing | Yes (Self-sticking) | No (Dry weave) |
Primary Use Case | Seams, corners, crack repairs | Entire wall facades, EIFS, heavy stucco |
Load Distribution | Localized bridging only | Global surface stress distribution |
Application Method | Stick to dry wall, mud over it | Embed directly into wet mortar base coat |
Having the best materials means nothing if your crew installs them incorrectly. Proper implementation dictates the final strength of the wall. We consistently see contractors making the same costly errors. Following strict best practices guarantees your plaster reinforcement mesh performs exactly as engineered.
You must embed the fibers dynamically. We call this the wet-on-wet rule. Here is the standard operating procedure:
Apply a generous base coat of mortar directly to the bare substrate. Use a notched trowel to ensure even thickness.
Unroll your fiberglass mesh and press it gently into the wet base coat.
Position the fibers into the top third of the mortar layer. Do not push them all the way to the back.
Immediately trowel the surface flat. Ensure the mortar squeezes completely through the apertures. You should barely see the grid pattern underneath the smooth surface.
We see the dry tack mistake on sites everywhere. Contractors want to save time. They staple or tack the dry roll directly against the bare wall. They then try to push thick plaster through the grid from the outside.
This method guarantees delamination. The mortar never reaches the space directly behind the threads. You create thousands of microscopic air voids behind the grid. When the wall moves, the plaster simply shears off the wall. Always embed into wet mud. Never staple dry.
Tensile stress travels rapidly across the wall surface. It searches for weak points. Seams are naturally weak. You must mandate a strict 10cm (4-inch) overlapping rule at all vertical and horizontal seams.
If you butt the edges together without overlapping, the stress transfers directly into the mortar at the joint. You will see a perfectly straight vertical crack mirror the seam within a year. The 10cm overlap ensures the stress passes smoothly from one roll to the next without breaking the mortar.
Windows and doors are structural weak points. Normal building settlement concentrates immense diagonal stress exactly at these corners. Standard horizontal rolling will not stop these cracks.
You must apply 45-degree diagonal patches at every window and door corner. Cut strips approximately 30cm long. Press them diagonally across the corners before applying the main wall layer. This simple extra step absorbs the heavy corner stress effectively. Additionally, utilize pre-formed plastic or metal corner beads featuring attached side wings. These wings tie the sharp 90-degree corners directly into the main flat-wall matrix.
Protecting your plaster requires logical material selection and disciplined installation. Your shortlisting logic must begin with chemistry. If your mix uses Portland cement, you must insist on acrylic-coated, alkali-resistant products. Next, evaluate your environmental exposure. Use lightweight grades for interior aesthetics and 145g/m² or heavier for exterior facades. Scale your procurement based on accurate square footage, factoring in an extra 10% for the mandatory seam overlaps.
Do not order a full shipping container blindly. Recommend your purchasing department order sample rolls first. Test them on-site. Run the snap, burn, and fold tests. Verify the flexibility and trowel-ability with your own plaster crew. Once the sample passes your physical checks and the 28-day chemical data is verified, you can commit to bulk orders confidently. You will deliver flawless, crack-free walls that stand the test of time.
A: Look closely at the technical data sheet for acrylic copolymer coating specifications. Do not rely on marketing claims alone. Always request accelerated aging test reports from the manufacturer. A truly resistant product retains 50% of its tensile strength after a 28-day alkaline soak. Physically, high-quality coated materials feel slightly rigid, lock their weave tightly, and will not fray easily when you cut them.
A: No. Interior grades are typically too light (usually under 90g/m²) for outdoor use. They cannot withstand the severe thermal expansion, wind sheer, and heavier mortar loads found in exterior environments. Using them outside leads to rapid structural failure and facade cracking. Always specify a weight of 145g/m² or higher for any exterior stucco or EIFS application.
A: Tensile stress travels continuously across the surface of the wall. If your seams do not overlap by at least 10cm (4 inches), the stress hits a dead end. It transfers directly into the unreinforced mortar at the joint. This always results in a straight-line crack perfectly mirroring the buried seam. Overlapping creates a continuous, unbroken web of tension support.
A: Always store the rolls vertically on their ends in a dry, covered environment. Do not stack them flat, as heavy weight can crush and deform the grid structure. Prolonged exposure to direct UV rays or heavy moisture before installation can prematurely degrade the protective alkaline-resistant coating. Keep them wrapped until immediately prior to application.


