
Views: 0 Author: Site Editor Publish Time: 2026-07-09 Origin: Site


Marble mosaic installations carry incredibly high stakes on any commercial or residential job site. Premium natural stone materials demand absolute structural integrity from day one. Contractors need a flawless backing to guarantee lasting stability under daily use. Natural marble offers undeniable, timeless aesthetic appeal. However, installing it presents unforgiving engineering realities that quickly expose poor preparation. Heavy dead weight, inherent porosity, and significant sheer stress constantly test your chosen bonding methods. A weak link here leads directly to cracked grout, loose tiles, and compromised waterproofing. This article delivers a deep technical evaluation of modern pre-assembly methods. We want to help contractors, architects, and project managers select the ideal backing system for their specific environment. Choosing correctly prevents costly call-backs and averts massive installation failures. Read on to master structural support mechanics, environmental adaptations, and the crucial nuances of adhesive compatibility.
Evaluate environmental exposure first: Wet environments demand alkali-resistant fiberglass mesh; standard meshes risk degradation and tile failure.
Adhesive compatibility is non-negotiable: The glue binding the marble to the mesh must not interfere with the thinset's ability to bond with the actual stone.
Pre-assembly dictates speed vs. precision: While mesh accelerates layout, face-mounting offers superior mortar coverage for demanding commercial applications.
Verify supplier specifications: Always assess a tile backing net for grid size, flexibility, and tensile strength before shortlisting materials.
Natural marble brings unique structural challenges that separate it from standard ceramic options. It carries a heavy dead load. It often features fragile, unpredictable natural veining. It reacts poorly to trapped moisture or shifting substrates. Standard glass or ceramic mosaics are much lighter and far more uniform in their composition. Marble requires rigorous structural reinforcement before it even reaches the wall or floor.
This is exactly where a strong, precisely engineered mosaic marble backing mesh becomes a vital asset. It effectively distributes dead weight across the entire multi-piece sheet. It locks complex arrangements together during long transport and rough handling. Installers rely heavily on it to maintain perfectly consistent joint spacing when transferring the product from the box to the thinset. Without this crucial underlying support, fragile marble pieces often shift, sink, or snap under minimal pressure.
Installers look for highly specific success criteria to validate a backing system in the field. You should track these three critical benchmarks on every job to ensure long-term viability:
Zero sheet sagging: The sheet must remain rigidly in place when applied to vertical surfaces, preventing gravity-induced joint compression.
Consistently uniform grout lines: The backing must restrict lateral movement, keeping grout spaces identical across multiple sheet transitions.
Optimal mortar contact: The mesh grid must allow a minimum of 95% thinset coverage directly on the back of the stone to meet industry standards.
Achieving these benchmarks requires installers to deeply understand the physical properties of the support structure. A poor quality backing grid compromises the entire installation before the thinset even cures.
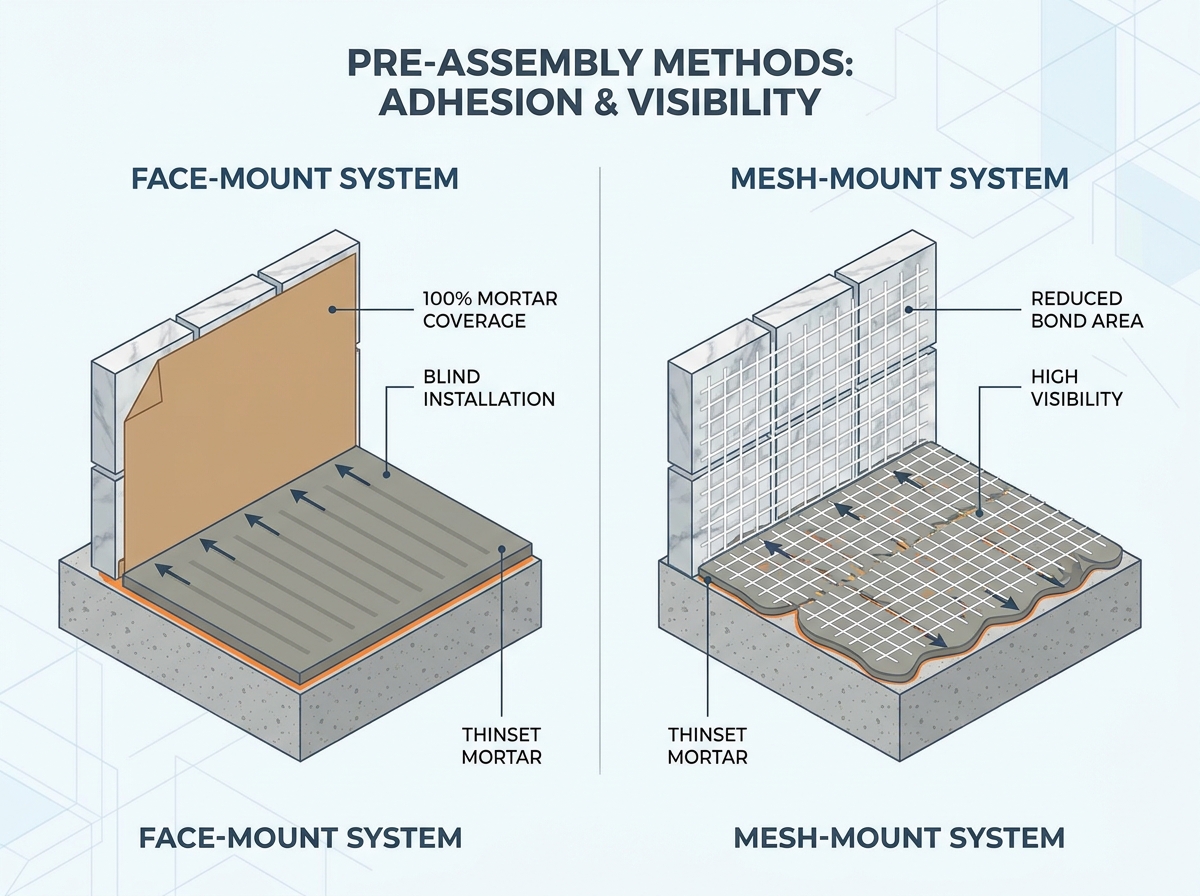
Contractors generally choose between two primary pre-assembly methods when planning a project. Each offers distinct engineering advantages and specific limitations. Your choice dictates installation speed, maneuverability, and ultimate structural integrity. We must objectively evaluate these options to align them with project demands.
Face-mounting utilizes a clear film, heavy paper, or strong tape applied to the front of the tiles. This traditional method leaves the back of the stone completely bare. Consequently, you achieve 100% direct mortar coverage on the stone. This makes face-mounting exceptionally reliable in submerged environments like swimming pools or heavy-duty commercial floors. However, it requires a blind installation technique. You cannot easily see the grout joints during initial placement. Adjusting individual tesserae before the thinset fully cures proves highly difficult because the front film locks everything rigidly in place.
Mesh-mounting applies a specialized woven grid directly to the back of the tiles. Installers gain high visibility during layout and troweling. You can place sheets much faster because the front remains fully exposed. You can also quickly cut the backing on-site to accommodate outlets or plumbing fixtures. The primary drawback involves the physical footprint. The mesh occupies surface area on the back of the stone. This physical barrier can reduce the actual thinset-to-stone bond if installers fail to use the correct troweling techniques.
Use this decision matrix to evaluate your options when choosing between standard methods and a pre-assembled mosaic mesh.
Application Scenario | Recommended Assembly Method | Key Rationale |
|---|---|---|
Dry-wall decorative features | Mesh-Mount | Significantly speeds up vertical layout and allows easy cutting around fixtures. |
Standard residential bathroom floors | Mesh-Mount | Provides excellent visibility for quick, precise joint adjustments during placement. |
High-moisture commercial flooring | Face-Mount | Maximizes direct mortar-to-stone adhesion to handle heavy foot traffic and moisture. |
Fully submerged swimming pools | Face-Mount | Eliminates sub-surface backing decay risks entirely in constant underwater environments. |
Choosing the wrong method dramatically increases the risk of call-backs. Assess your specific environmental variables before committing to a factory order.
Industry professionals frequently encounter one specific, catastrophic failure point on custom jobs. The factory glue holding the tile to the mesh breaks down prematurely. Alternatively, it reacts poorly with the chosen installation thinset. This unseen chemical failure compromises the entire surface. Water-soluble adhesives dissolve rapidly when exposed to wet mortar. Conversely, over-applied waterproof glues act as a barrier, resisting the thinset and preventing a secure bond.
You must test the mosaic back-netting thoroughly before authorizing bulk installation. We strongly recommend performing a simple "soak test" on-site. Submerge a sample sheet in a bucket of warm water for roughly thirty minutes. Check the adhesive stability manually. If the tiles slide off the grid easily, the factory glue is clearly water-soluble. You must adjust your mortar choice or reject the material entirely.
Thinset selection dictates long-term success or rapid failure. Always pair mesh-backed marble with high-quality modified polymer thinsets. These advanced mortars contain synthetic resins. They aggressively grip both the natural stone and the synthetic netting. Never use traditional premixed mastics for marble mosaics under any circumstances. Mastics rely on air-drying, which becomes impossible behind tightly packed stone. They trap moisture behind the tile. Trapped moisture rots the mesh, breeds mold, and severely discolors expensive natural stone.
Pro Tip: Master the "knock-down" troweling method to guarantee structural integrity. First, apply your mortar using the notched side of your trowel to establish depth. Then, lightly flatten the mortar ridges using the flat side of the trowel. Press the mosaic sheet firmly into this flattened bed using a grout float. This specific technique ensures the mortar fully penetrates the grid. It guarantees maximum direct contact between the marble and the thinset, bypassing the mesh barrier entirely.
Scalability in commercial projects requires strict compliance with established environmental standards. Installation environments dictate your material specifications. The American National Standards Institute (ANSI) provides exceptionally clear guidelines for wet area installations. You must align your structural backing choices with these rigorous industry standards to prevent liability issues.
Dry applications offer considerably more leniency for material selection. Entranceways, living room accent walls, and kitchen backsplashes rarely face standing water. Standard fiberglass or nylon meshes perform perfectly well in these dry zones. Here, your primary focus shifts toward layout speed and structural rigidity. You want a firm, reliable backing to prevent heavy sheet sagging on vertical surfaces during the initial cure phase.
Wet applications demand highly specialized, chemically resistant materials. Showers, steam enclosures, and wet rooms introduce constant, aggressive moisture. In these environments, you must specify an alkali-resistant mosaic tile installation mesh. Standard untreated fiberglass deteriorates rapidly when exposed to cement. The naturally alkaline nature of Portland cement slowly dissolves unprotected glass fibers over time. Once the fibers dissolve, the heavy marble loses its unified structural support.
Consider the crucial relationship between your backing, the thinset bed, and the waterproofing membrane. A standard wet mortar bed retains water for extended periods. If your mesh degrades due to alkalinity, the individual tiles float freely on the membrane. An alkali-resistant coating actively protects the glass fibers from caustic cement paste chemicals. This specialized coating ensures the installation survives decades of daily water exposure without internal structural collapse.
Project managers and procurement teams must evaluate vendors carefully. Procuring the correct raw materials prevents disastrous job site headaches. You should treat the backing as a vital structural component, not an afterthought. Careful shortlisting logic separates reliable suppliers from generic distributors.
Grid size must perfectly complement your specific tile size. As a fundamental rule of thumb, the aperture (hole size) of the marble backing mesh should allow maximum exposed stone. If the weave is too tight, the thinset simply cannot reach the marble surface. If the weave is too wide, small stone chips fall through or twist out of alignment. Always ensure enough exposed bare stone exists within the grid squares to facilitate direct mortar adhesion.
Material flexibility represents another critical evaluation metric. Assess the physical rigidity of sample sheets before buying in bulk. If the weave is excessively stiff, the sheet causes "tenting." It refuses to conform to minor curves or slightly uneven substrates. If it is too loose and floppy, you suffer immediate joint distortion during simple handling. You want a beautifully balanced weave that drapes gently over the substrate but holds firm tension across the joints.
Execute this essential three-point checklist when requesting technical data sheets (TDS) from manufacturers before placing a bulk order:
Verify the alkali resistance certification: Demand proof of testing to ensure long-term cement-based mortar compatibility.
Confirm the tensile strength ratings: Ensure the material handles the substantial dead weight of heavy stone sheets safely without snapping.
Check the factory adhesive composition: Identify the specific chemical makeup to avoid catastrophic water-soluble glue failures on wet-area projects.
Rigorous upfront procurement practices eliminate the vast majority of installation failures before the first bucket of mortar is mixed.
Achieving a flawless marble mosaic installation relies entirely on invisible structural groundwork. The backing mesh is never just a convenient packaging method for transport. It acts as the fundamental mechanical reinforcement for your entire wall or floor system. Choosing inferior materials compromises the beautiful natural stone resting above it.
Take these actionable steps to ensure lasting, professional results:
Prioritize tested alkali-resistant materials for any project involving cementitious mortars or wet environmental conditions.
Rigorously test factory adhesives using the standard soak method to guarantee chemical compatibility with your chosen thinset.
Match your grid aperture carefully to the specific dimensions of your marble chips to maximize direct bond strength.
Mandate modified polymer thinsets exclusively and strictly prohibit mastic usage to protect the stone from internal moisture damage.
Implementing these precise engineering practices guarantees a highly durable, compliant, and visually stunning outcome.
A: Yes, you can confidently install them in shower pans under strict conditions. Ensure the backing is an alkali-resistant mesh. Confirm the factory adhesive is entirely waterproof so it won't break down under constant moisture. Finally, the installer must employ the knock-down method to achieve a minimum 95% mortar coverage directly on the stone.
A: For simple layout adjustments, slice the backing from the rear using a sharp utility knife. This approach preserves the individual tiles and cleanly separates the grid. If you need to trim the actual stone pieces along a wall edge, use a high-quality wet saw to cut through both the marble and the mesh simultaneously.
A: Tiles generally detach due to two primary failures. First, water-soluble factory glue may break down when exposed to wet thinset. Second, the installer might trowel too lightly. Light troweling bonds the mortar only to the mesh layer, leaving the heavy marble unattached. You must press firmly to push thinset through the grid.


